User Management System - Using Trigger.dev X Supabase

Introduction
Supabase and Trigger.dev are two incredibly powerful tools that have gained recognition in the realm of serverless application development. Supabase provides an open-source platform for building web and mobile applications with ease, while Trigger.dev allows you to set up serverless functions in seconds. Together, they offer a seamless development experience. In this blog post, we'll explore a practical use case of combining Supabase and Trigger.dev to create a user management system.

Why Trigger.dev and Supabase
Before diving into the code, let's take a moment to understand why Trigger.dev and Supabase make an excellent choices for building a user management system. Trigger.dev is a flexible and versatile backend-as-a-service (BaaS) platform that allows developers to build logic-driven APIs easily. Supabase, on the other hand, is an open-source Firebase alternative that offers a PostgreSQL database with real-time capabilities. Combining these two platforms provides the best of both worlds - Trigger.dev's ease of use and Supabase's scalability and real-time capabilities.

Understanding User Management Systems
User Management System, or UMS, is the backbone of any application that requires user accounts, profiles, and access control. It encompasses features like user registration, login, password management, role-based access control, and more. A robust UMS is essential for security, personalization, and ensuring a smooth user experience. Implementing these features manually can be complex and time-consuming, leading to potential security vulnerabilities and inefficiencies.
Practical Usage of a User Management System
User Registration and Authentication: With Trigger.dev and Supabase, implementing user registration and authentication becomes a breeze. You can create custom signup forms and handle user validation easily using Trigger.dev's intuitive interface. Supabase provides a secure and scalable data storage solution, ensuring that user credentials are stored safely. Additionally, Supabase's authentication system allows for various authentication methods, including email/password, social logins, and more.
User Profiles and Personalization: Trigger.dev and Supabase provide the tools needed to create and manage user profiles effectively. You can store user-specific data, such as preferences, settings, and user-generated content, in Supabase's PostgreSQL database. Real-time capabilities offered by Supabase ensure that any changes to user profiles reflect instantly across the application, providing a seamless and personalized user experience.
Role-based Access Control (RBAC): A user management system is incomplete without role-based access control. Trigger.dev offers a straightforward way to implement RBAC, allowing you to define roles and permissions for different user types. With Supabase's PostgreSQL database, you can store role information and policies securely. This combination ensures that only authorized users can access specific resources or perform certain actions, resulting in a secure and controlled environment.
Email Notifications and Communication: Trigger.dev's integration with email service providers allows you to easily send out email notifications to users. Whether it's account verification emails, password reset requests, or any other communication, you can automate the process with just a few lines of code. This feature, combined with Supabase's ability to trigger real-time events on data changes, enables you to create tailored user communication experiences.
Monitoring and Analytics: Both Trigger.dev and Supabase offer robust monitoring and analytics tools to track and analyze user data. You can monitor user activity, track signups, analyze engagement metrics, and gain insights into user behaviour. This information can be used to improve the user experience, optimize performance, and make data-driven decisions for your application.

Getting Started
These instructions are adapted from the original Supabase Next.js Auth & User Management Starter with additional instructions for configuring Trigger.dev and Resend.com.
Configurations
Creating a new project
Sign up to Supabase - https://supabase.com/dashboard and create a new project. Wait for your database to start.
Run 'User Management' Quickstart
Once your database has started, head over to your project's SQL Editor and click Quickstarts. Scroll down until you see User Management Starter: Sets up a public Profiles table which you can access with your API. Click that, then click RUN to execute that query and create a new profiles table. When that's finished, head over to the Table Editor and see your new profiles table.
Get the URL and key
Go to the Project Settings ⚙️, open the API tab, and find your API URL, the anon key, and the service_role key, you'll need these in the next step. The anon key is your client-side API key. It allows "anonymous access" to your database until the user has logged in. Once they have logged in, the keys will switch to the user's login token. This enables row-level security for your data. Read more about this here.
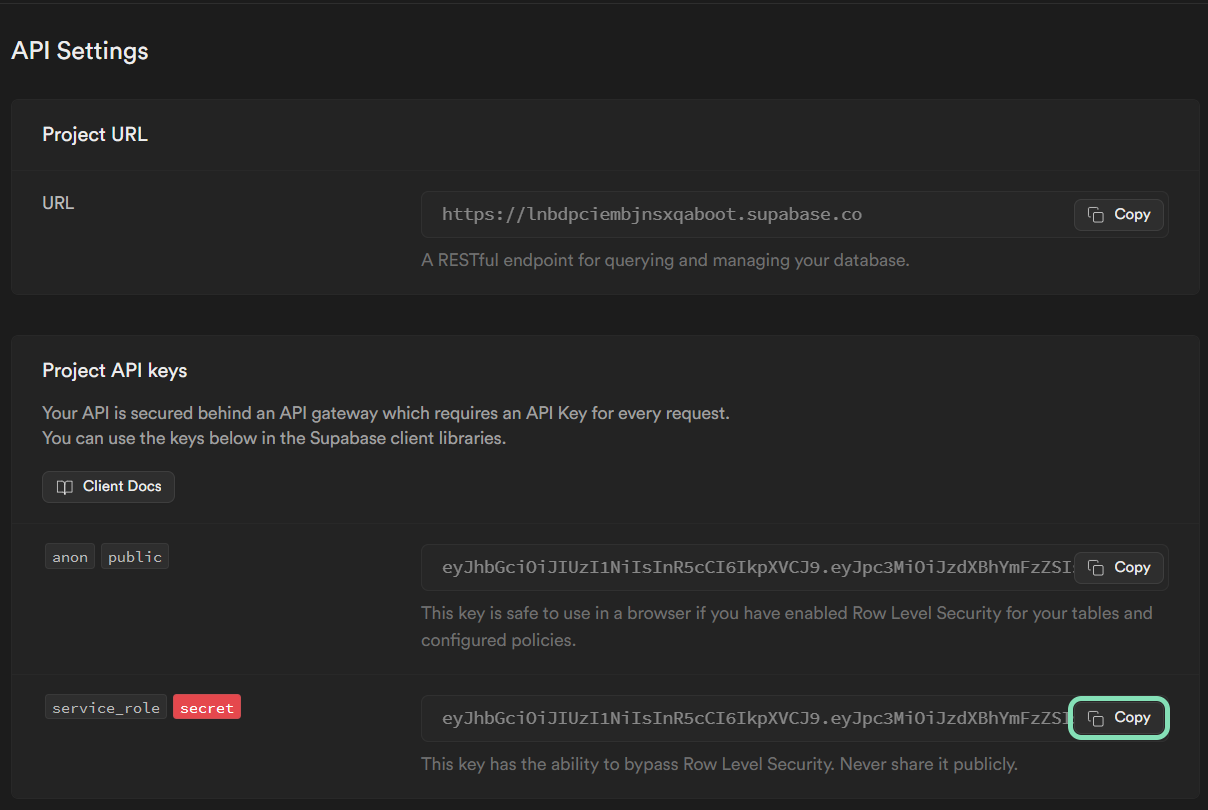
Note - The
service_rolekey has full access to your data, bypassing any security policies. These keys have to be kept secret and are meant to be used in server environments and never on a client or browser.
Setting up Environment Variables
Copy the .env.example file to .env.local :
cp .env.example .env.local
And then fill out your .env variables :
NEXT_PUBLIC_SUPABASE_URL="https://<your project id>.supabase.co"
NEXT_PUBLIC_SUPABASE_ANON_KEY="<your anon key>"
SUPABASE_SERVICE_ROLE_KEY="<your service_role secret>"
Configuring Resend.com
If you don't already have a Resend.com account, you can create a free account and send up to 3k emails a month: Resend.com Sign up. After configuring your sending domain, visit their API Keys page and create a new API Key that allows sending access only:
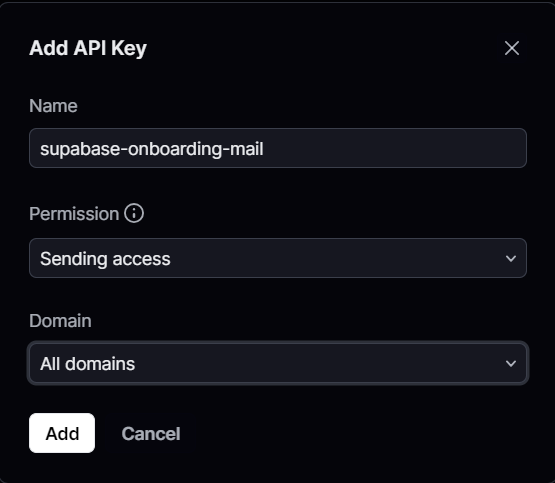
Copy the API Key and the domain you configured earlier and fill out the following env vars in .env.local:
RESEND_API_KEY="<resend api key here>"
RESEND_FROM_EMAIL="hi@yourdomain.com"
Configuring Trigger.dev
If you don't already have a Trigger.dev account, you can create one here. Under the free tier you can do 10k job runs a month.
During signup, you'll be asked to create your first Trigger.dev project. Once you've done that, head over to the Project "Environment & API Keys" page and copy the DEV environment server key:
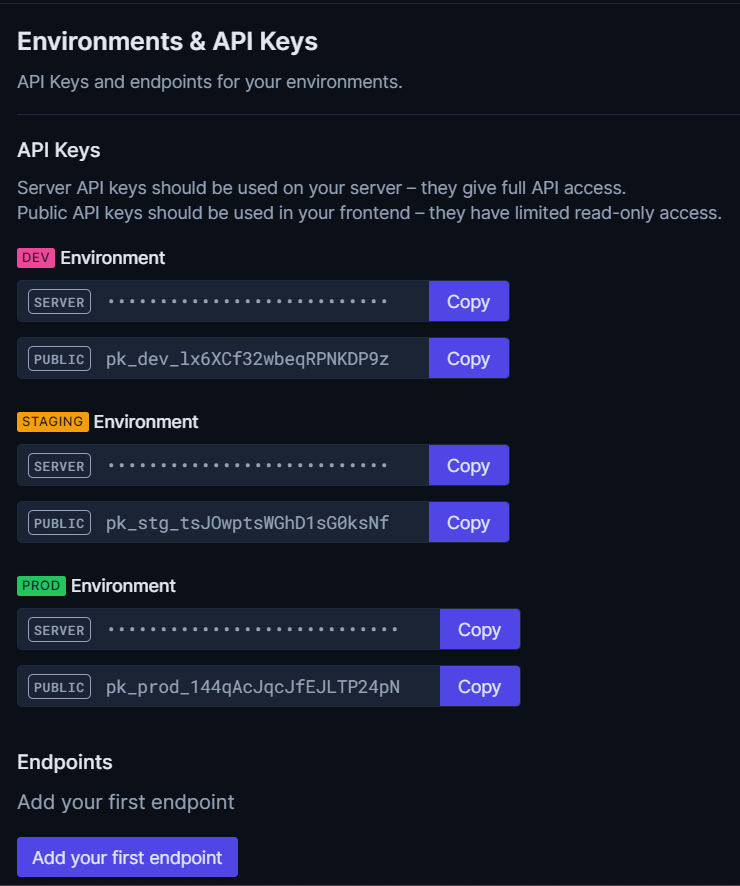
Then fill out the TRIGGER_API_KEY environment variable in the .env.local file.
Configuring Supabase Management
The Trigger.dev SupabaseManagement integration that is used in this project to trigger jobs on new user signups makes use of the Supabase Management API and provides credentials for making requests through their new OAuth implementation.
Head back to your newly created Trigger.dev project in the dashboard navigate to the "Integrations" page and select the "Supabase Management" integration:
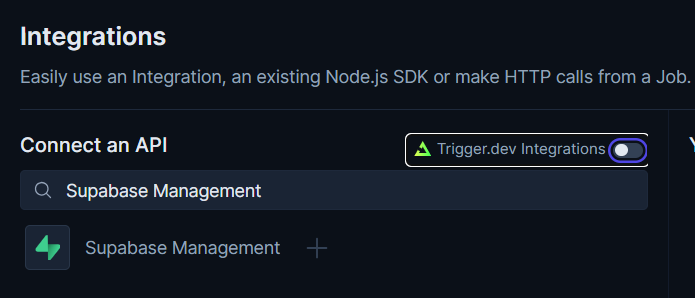
Next, fill out the integration form and make sure to use the ID supabase-management so it matches the following code:
// Use OAuth to authenticate with Supabase Management API
const supabaseManagement = new SupabaseManagement({
  id: "supabase-management",
});
It should look like this :
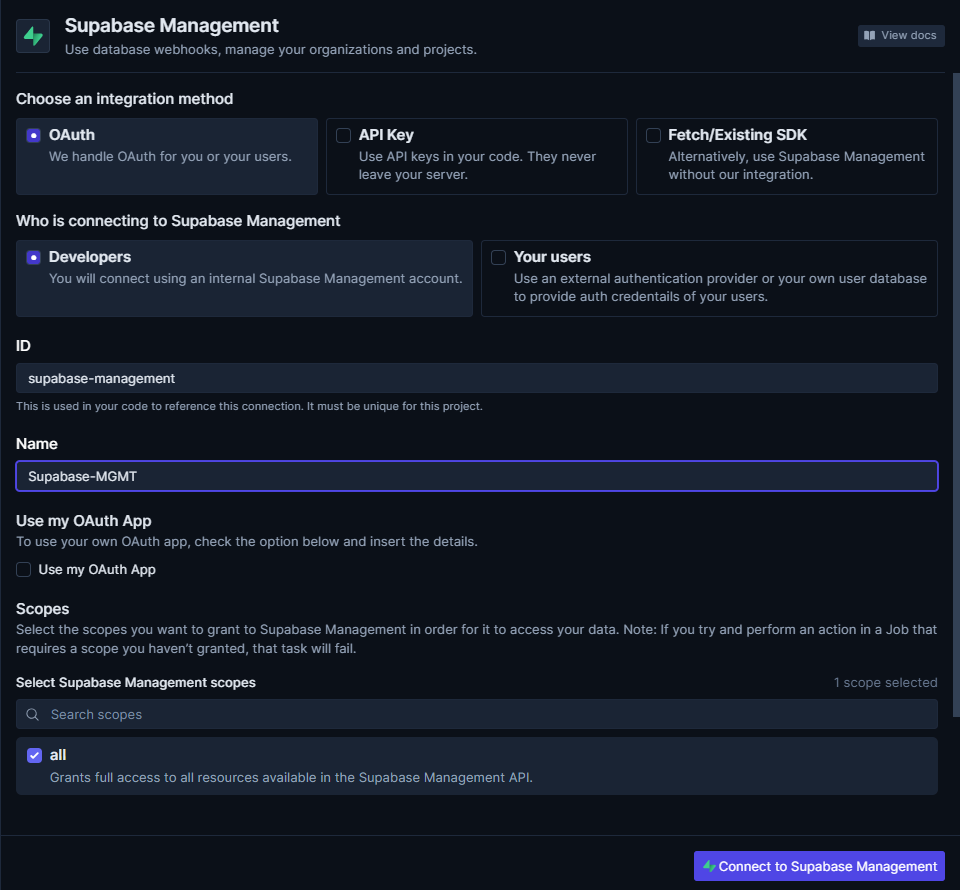
Click on the "Connect to Supabase Management" in the lower-right corner and you'll be redirected to the Supabase OAuth dialog. Make sure to select the Supabase Org you created your Supabase project in above, and then click the "Authorize Trigger.dev" button :
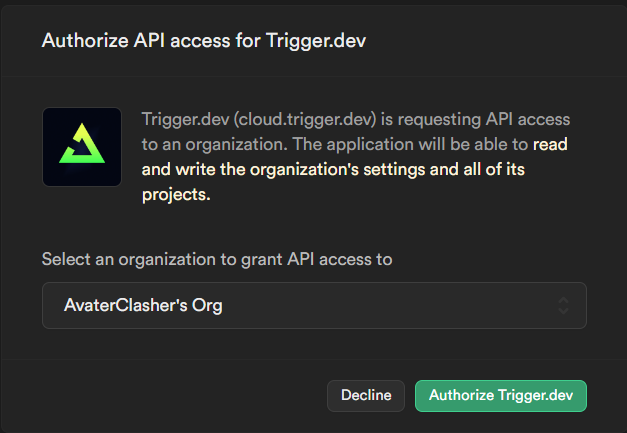
You'll be redirected back to Trigger.dev with your newly created integration. Internally, we store your Supabase Management API access token and refresh token (both encrypted) and we'll provide a working access token whenever a job runs that use the supabase-management integration. For more about integrations and OAuth, see our guide here.
Running The Application
Run the application: npm run dev. This will concurrently run the next dev server on port 3000 and the @trigger.dev/cli dev command, which will tunnel your Next.js server to Trigger.dev and index any jobs defined.
Open your browser to https://localhost:3000/ and you are ready to test this Job 🚀.
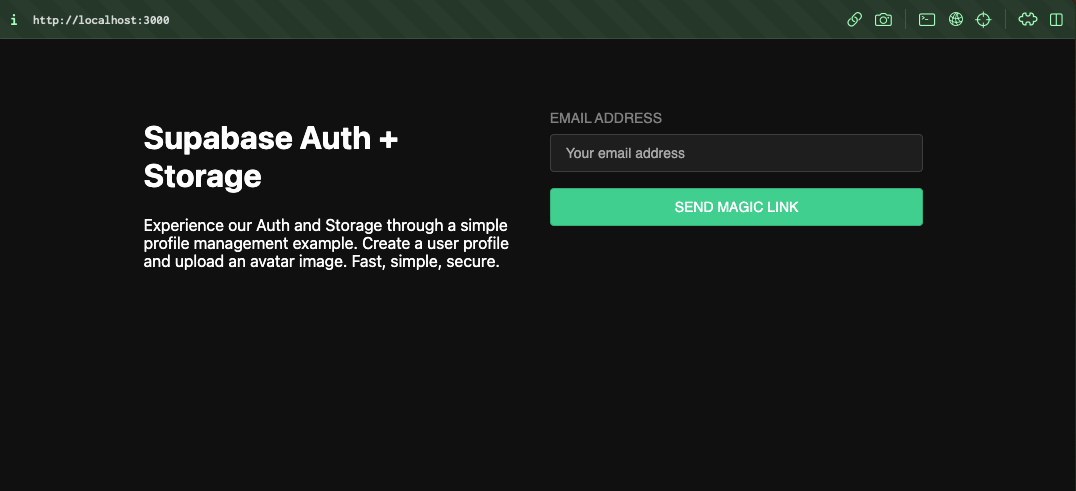
Enter your email, send the magic link, and once you have clicked the magic link in the email the Job will start running.
Try signing up and then you can head back to the Jobs list in your Trigger.dev project dashboard and you should see your newly created Job.
Click on that and you should see your first run.
Code :
The code is hosted on their official Github. For those who want to check that.
Here are some of the files that have to be set up for this to work in a next.js project :
<root>/trigger.ts
This file configures and exports the TriggerClient with the API Key:
import { TriggerClient } from "@trigger.dev/sdk";

export const client = new TriggerClient({
  id: "supabase-onboarding-emails",
  apiKey: process.env.TRIGGER_API_KEY,
  apiUrl: process.env.TRIGGER_API_URL,
});
<root>/supabase-types.ts
This file contains the Generated Typescript types. You can regenerate them using the following command, making sure to use your own Supabase project ID from above.
Note: The project ID can be extracted from the Project URL. For example, if the project URL is
https://hyzxawecvfsdklin.supabase.co, then the project ID ishyzxawecvfsdklin.
SUPABASE_PROJECT_ID="<your supabase project id>" npm run generate-types
<root>/jobs/supabase.ts
This contains the bulk of the Trigger.dev code, including:
The
SupabaseManagementintegrationThe
ResendintegrationThe Supabase triggers
The Trigger.dev job runs whenever a user confirms their email address and sends spaced-out welcome emails.
import { client } from "@/trigger";
import { Database } from "@/supabase-types";
import { SupabaseManagement } from "@trigger.dev/supabase";
import { Resend } from "@trigger.dev/resend";

// Use OAuth to authenticate with Supabase Management API
const supabaseManagement = new SupabaseManagement({
  id: "supabase-management",
});

// Using the SupabaseManagement integration, configure an instance of Supabase triggers
// with the generated types imported above, the supabase project URL.
// Internally, this will run a SQL query in your Supabase database that adds a Database Webhook that points to trigger.dev,
// which will eventually become a job run.
const supabaseTriggers = supabaseManagement.db<Database>(
  process.env.NEXT_PUBLIC_SUPABASE_URL!
);

// Resend uses API key auth only, so we just include it here. This API Key is never sent to trigger.dev.
const resend = new Resend({
  id: "resend",
  apiKey: process.env.RESEND_API_KEY!,
});

client.defineJob({
  id: "welcome-email-campaign",
  name: "Welcome Email Campaign",
  version: "1.0.0",
  trigger: supabaseTriggers.onUpdated({
    // Trigger this job whenever a user is confirmed
    schema: "auth",
    table: "users",
    filter: {
      old_record: {
        email_confirmed_at: [{ $isNull: true }],
      },
      record: {
        email_confirmed_at: [{ $isNull: false }],
      },
    },
  }),
  integrations: {
    resend,
  },
  run: async (payload, io, ctx) => {
    if (!payload.record.email) {
      return;
    }

    const isTestOrDev =
      ctx.run.isTest || ctx.environment.type === "DEVELOPMENT";

    // Only wait for 10 seconds when running in as a test or in the development environment
    await io.wait("wait-1", isTestOrDev ? 10 : 60 * 60); // 1 hour

    const email1 = await io.resend.sendEmail("email-1", {
      to: payload.record.email,
      subject: `Thanks for joining Acme Inc`,
      text: `Hi there, welcome to our community! This is the first email we send you to help you get started.`,
      from: process.env.RESEND_FROM_EMAIL!,
    });

    await io.wait("wait-2", isTestOrDev ? 10 : 60 * 60 * 12); // 12 hours

    const email2 = await io.resend.sendEmail("email-2", {
      to: payload.record.email,
      subject: `Here are some tips to get started`,
      text: `Hi there, welcome to our community! This is the second email we send you to help you get started.`,
      from: process.env.RESEND_FROM_EMAIL!,
    });

    await io.wait("wait-3", isTestOrDev ? 10 : 60 * 60 * 24); // 24 hours

    const email3 = await io.resend.sendEmail("email-3", {
      to: payload.record.email,
      subject: "Do you have any questions?",
      text: `Hi there, welcome to our community! This is the third email we send you to help you get started.`,
      from: process.env.RESEND_FROM_EMAIL!,
    });

    return {
      email1,
      email2,
      email3,
    };
  },
});
<root>/app/api/trigger/route.ts
This file uses the @trigger.dev/nextjs adapter to export a Next.js App Route at http://localhost:3000/api/trigger that exposes the TriggerClient and all the jobs to the Trigger.dev platform, which coordinates with the endpoint to run jobs, handle webhooks, and register triggers.
import { createAppRoute } from "@trigger.dev/nextjs";
import { client } from "@/trigger";

// Replace this with your own jobs
import "@/jobs/supabase";

//this route is used to send and receive data with Trigger.dev
export const { POST, dynamic } = createAppRoute(client);

Conclusion
In a world where user data protection, engagement, and personalization are paramount, Trigger.dev and Supabase have emerged as the dream team for simplifying User Management Systems. As we wrap up this guide, it's essential to reiterate the remarkable benefits this combination offers. Your applications will run more efficiently, with less development time spent on repetitive user management tasks and more on innovation. Security will be fortified, as you tap into proven, best-in-class solutions. Scalability is no longer a daunting challenge, but an achievable goal.
As you embark on your journey to implement Trigger.dev and Supabase in your applications, remember that this is more than just a technical choice; it's an investment in delivering the best user experiences. It's an assurance that your users will have a seamless and secure environment to interact with your application, fostering trust and loyalty. It's a path to less stress and more productivity for developers, enabling you to focus on what truly matters – creating remarkable applications.
So, don't hesitate to explore the potential of Trigger.dev and Supabase for user management. Start simplifying your user management processes today and witness the transformative impact they can have on your projects. The combination of Trigger.dev and Supabase is not just practical; it's a game-changer, offering an easier, more secure, and more efficient way to manage your users, ensuring that your applications shine in a crowded digital landscape.
If you like it please star the two opensource projects Supabase and Trigger.dev ⭐